Gone are the days when WordPress was referred to as just blogging software.
The ability to extend its functionality via plugins and themes, group posts or structured data into various types and also the arrival of the WP Rest API into core, has seen it further evolve into a full blown content management system and development platform.
Over the years, I have successfully developed a number of custom web applications built on-top WordPress that heavily utilize custom post types. An example of one of these web applications is the theme marketplace of my WordPress plugin called ProfilePress.
On a closer look at the theme marketplace linked above, you will discover that it uses a custom pagination system evident in the URL of the Next / Prev pagination links. Thus, it is possible for you to build an in-house pagination system that will work perfectly in querying a custom post type (CPT).
Enough said, let’s get down to the purpose of this tutorial which is, learning the intricacies of custom post types in WordPress.
I hope to address the many hurdles I have personally encountered working with CPTs as well as some cool stuff you can do with it.
WordPress can hold and display many different types of content. A single item of such content is generally called a post, although a post is also a specific post type.
Internally, all the post types are stored in the same place, in the wp_posts database table, but are differentiated by a column called post_type.
Post type refers to the various structured data grouped together that is maintained in the WordPress database posts table.
Examples of post types are post (a group of blog posts), page (a group of pages), attachment (a group of uploaded media files), and revision (a groups of post revisions) that are native or built-in to WordPress.
Armed with the definition of post type, a new post type that is created and registered to WordPress is referred to as a custom post type.
If you’re building a company or business website with WordPress, examples of post types you could create are Portfolio, Testimonials and Products.
Now that we’ve understood the concept of custom post types, up next is learning how to create them.
Creating a custom post type is pretty easy. Firstly, register the post type with the register_post_type() function and finally, wrap register_post_type() in a function call and hook it to the init Action like so:
From the code above, you can see register_post_type() has a second function parameter that accepts a number of array arguments necessary in customizing every aspect of a custom post type.
You should now see the Portfolio custom post type appear in WordPress admin dashboard.
It’s worth noting that when calling register_post_type(), the second argument is optional. That is, a CPT can be also created as follows:
If a CPT is created in this manner, it won’t show up in the admin dashboard menu (albeit still accessible via direct URL access “http://example.com/wp-admin/edit.php?post_type=portfolio“) and its UI wordings (otherwise referred to as labels) and admin notices will be the same as the built-in post post type.
Let’s go over some of the array arguments for customising CPTs and their respective functions.
A plural descriptive name for your custom post type. For example, if you are creating a movie CPT, this should be Movies.
It will default to the value of $post_type which is the first parameter of register_post_type().
An array of labels for this post type. Each string is a bit of text displayed in a particular admin page.
Be sure to make these strings translatable if you’re creating a plugin for public use.
A full list of labels and their descriptions can be found here.
A short descriptive summary of what the post type is, although I haven’t found where this is used in WordPress admin.
Depending on its Boolean value, it’ll automatically decide what other arguments should be unless they’re specifically defined. If you’re looking to have more control over the public arguments, there are three specific arguments you may set:
By default, a new post type is added after the ‘Comments’ menu item in the admin. But you have to ability to move it to a suitable position of your choosing.
For example, setting the menu_position value to 70 will add your menu item below Users.
New post types will default to the Posts menu icon, but if you want a custom icon in it instead, set this label to the URL of the icon or image file.
You can also use any dashicon as your CPT icon.
Say you want to use the download dashicon, set this label to the dashicon value as follows:
This argument allows you to decide whether to make your CPT hierarchical or not. The default value is false. Set to true to make your CPT hierarchical.
The supports argument allows you to define an array of meta boxes and fields that will appear on the screen when editing or creating a new post. This defaults to title and editor.
Setting this argument to false will prevent the default (title and editor) behavior.
There are several available options:
Provides a callback function that will be called when setting up the meta boxes for the edit form. The callback function takes one argument $post, which contains the WP_Post object for the currently edited post.
This feature is particularly useful to developers for them to create custom meta boxes that will show up in the CPT edit screen.
An array of registered taxonomies like category or post_tag that will be used with this custom post type.
Setting this argument to true will enable archives for your custom post type. For example, say your CPT is books, visiting http://yoursite.com/books will display a list of posts belonging to books custom post type.
This argument allows you to define the permalink structure of your custom post type when viewing a single post or archive.
Default value is true and uses $post_type as slug. To prevent rewrites, set to false.
Let’s see some examples for clarity sake.
Say you created a review custom post type but wish to change the URL slug from review to assessment, using the following rewrite argument will change the URL from http://example.com/review/harry-potter/ to http://example.com/assessment/harry-potter/ for single posts and http://example.com/review/ to http://example.com/assessment/ for the CPT archive.
Whenever you do a rewrite of WordPress URL, ensure you click the Save Changes button in Settings >> Permalinks to recreate the rewrite rules.
So basically, the slug defines the new URL slug while with_front determines if the permalink structure be pre-pended with the front base.
Still not clear on with_front? Let’s see an example.
Say you have a permalink structure with blog appended to the URL as depicted in the image below.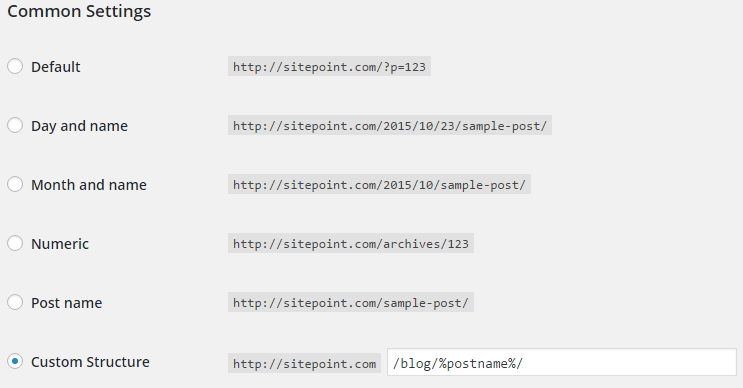
If with_front is set to false, the URL of a single post and post archive becomes http://example.com/blog/assessment/harry-potter/ and http://example.com/blog/assessment/ respectively but if it is set to true, the URL of a single post and post archive respectively becomes http://example.com/assessment/harry-potter/ and http://example.com/assessment/.
Notice the omission of blog in the latter? That’s the difference.
Use this argument to decide whether posts belonging to your custom post type can be exportable via the WordPress export tool. By default, this is set to true.
This argument allows you to control the query variable used to get posts of this type.
If set to true, it will allow you to request a book custom posts type via example.com/?book=harry-potter where harry-potter that is the URL slug of a book entry or post.
If set to a string rather than true (for example publication), you can do: example.com/?publication=harry-potter.
If query_var is undefined in your CPT registration array argument, it defaults to $post_type thus, it is always defined unless you set it to false.
Here comes the caveat. Whenever the value of a query_var is added as a query string to a URL, it will lead to a 404.
Let me clarify. Say the value of your CPT query_var is review and a query string with the key set to review was added to any URL of your WordPress site in any of the following forms:
This will cause a 404 to happen.
I actually learned about this the hard way. As at the time I had this issue, I created a ticket in WordPress core trac to report it as a bug.
It took me weeks to finally figure it out before some members of the core WordPress team replied my ticket.
Now that we’ve covered the foundations, it’s a good time to point out that there are a number of plugins in WordPress plugin repository that makes creating custom post types very easy.
Examples include (but are not limited to):
In this tutorial, we learned what custom post types are and how they’re created.
This is actually the first in a series on WordPress custom post types. In my next tutorial, we will learn how to customize the various admin notices, how to register custom taxonomies to a post type and adding contextual help tab to your CPT screen.
Until then, happy coding!
Collins is a web developer and freelance writer. Creator of the popular ProfilePress and MailOptin WordPress plugins. When not wrangling with code, you can find him writing at his personal blog or on Twitter.
© 2000 – 2022 SitePoint Pty. Ltd.
This site is protected by reCAPTCHA and the Google Privacy Policy and Terms of Service apply.
